Google Calendar Sync
WooCommerce Appointments syncs with Google Calendar so store appointments appear in Google, and busy Google events can block booking slots.
How it works
Google Calendar sync bridges your store and a Google calendar. Appointments push to Google when connected. In two-way mode, future Busy events on that calendar import as availability blocks so customers cannot double-book.
What you need
- A live site with HTTPS (not
localhostor plain HTTP) - A Google account (Gmail or Google Workspace)
- Pretty permalinks - any structure except Plain (required for REST API and OAuth; see Developers)
- Time (first-time setup): ~20-30 minutes in Google Cloud (Part A) + ~15 minutes in the plugin (Part B). Faster if you have done Google OAuth before - see Quick start below.
What syncs
- ✅ Appointments created or updated in WooCommerce → appear/update in Google Calendar
- ✅ Appointment changes in WooCommerce → update Google Calendar
Two-way only (Sync Preference → Two way)
- ✅ Future Google events marked Busy → block availability in WooCommerce
- ✅ Future Google event changes → can update linked appointments
- ✅ Future Google event deletions → can cancel linked appointments
What does not sync
- ❌ Google events marked Free or Available - only Busy blocks time
- ❌ Past Google events inbound (future window only, up to ~1 year)
- ❌ Google events on the WooCommerce admin calendar - they block slots only; they are not shown as appointment cards
Important
- Each staff member connects one calendar with their own OAuth token (Part C)
- Disconnecting the store calendar does not disconnect staff
- Outbound sync uses the site timezone - match Google Calendar for predictable times (Timezones)
- Re-sync from Google Calendar and inbound blocking require two-way sync and a Calendar ID selected
Quick start (if you've set up Google OAuth before)
-
Google Cloud: new project → enable Google Calendar API
-
OAuth consent: External or Internal → add scope
https://www.googleapis.com/auth/calendaronly (not read-only or events-only) -
Credentials: OAuth client ID → Web application → authorized redirect URI:
https://YOUR-DOMAIN/wc-api/wc_appointments_oauth_redirect -
Plugin: WooCommerce → Settings → Appointments → Google Calendar → paste Client ID and Secret → Save changes → Continue with Google → select Calendar ID → Sync Preference
For External apps in Testing, add each connecting Google account as a test user, or Publish the app for production.
Setup order: Part A - Google Cloud → Part B - Store settings → Part C - Staff calendars (optional)
Part A - Google Cloud Console
Create OAuth credentials that your WordPress site uses to access the Calendar API.
Google may label this APIs & Services → OAuth consent screen or Google Auth platform. Menus change over time; match the step names below to the closest screen in your console.
A1. Create a project
- Open Google Cloud Console.
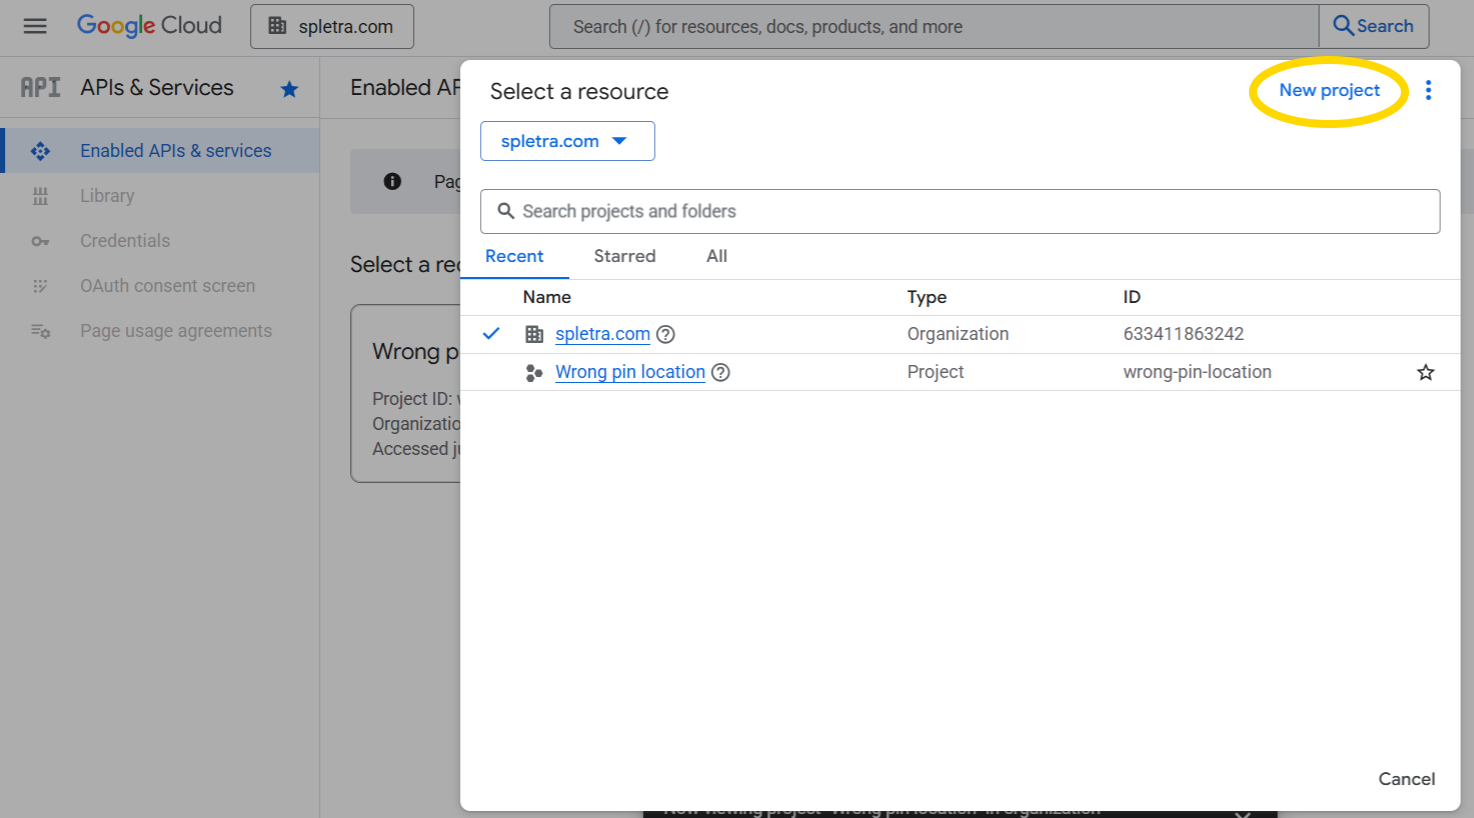
- Click the project picker (top bar) or press Ctrl+O.
- Click NEW PROJECT.
Left: Project picker with NEW PROJECT
Right: New project name dialog
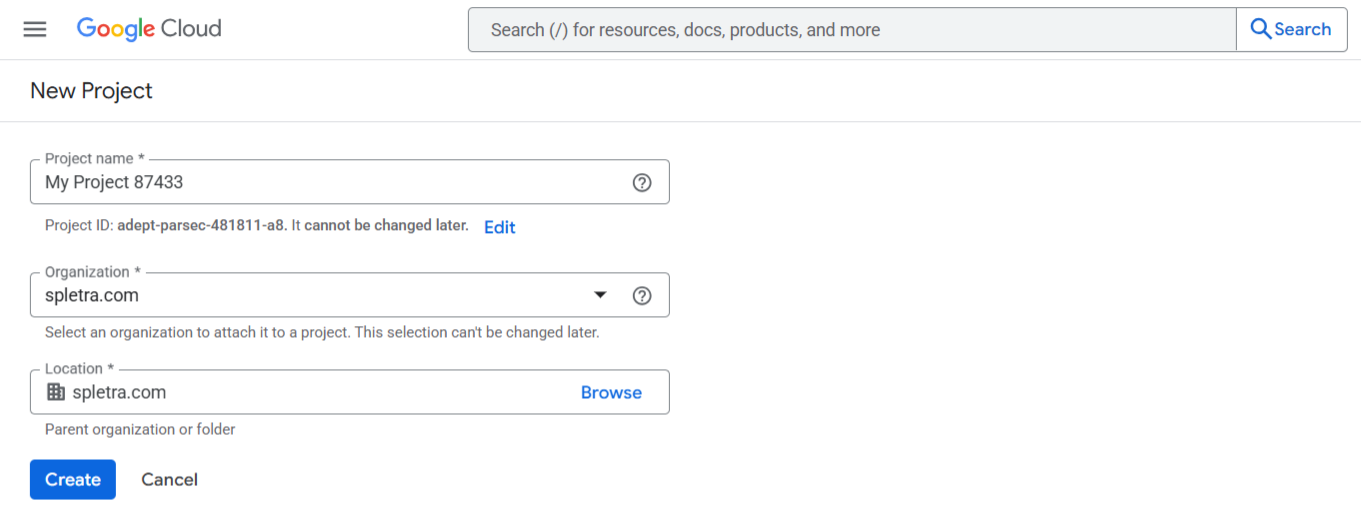
- Enter a project name (e.g.
WooCommerce Appointments) and click CREATE. - Select the new project from the picker when creation finishes.
A2. Enable Google Calendar API
- Open the menu (☰) → APIs & Services → Library.
- Search for Google Calendar API.
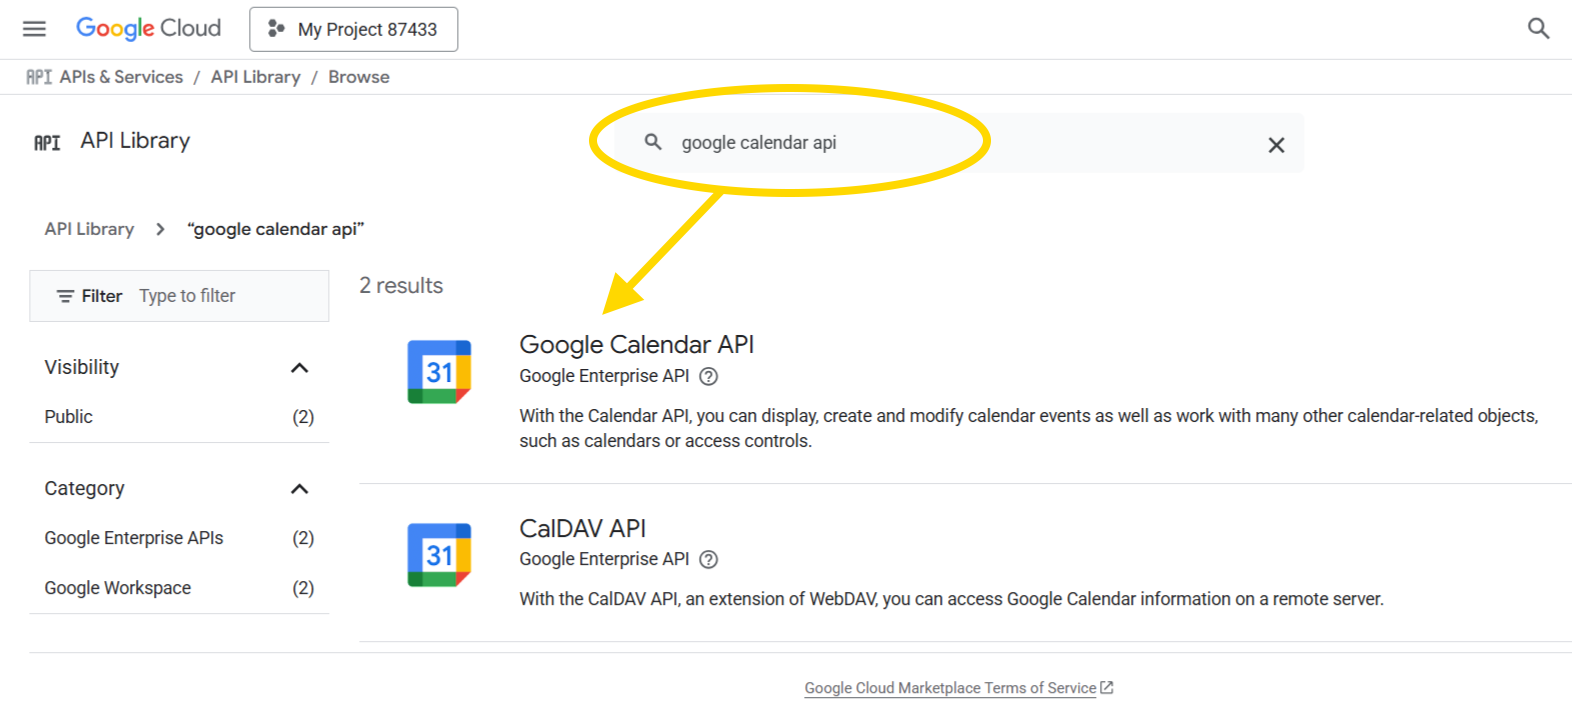
- Open Google Calendar API and click Enable.
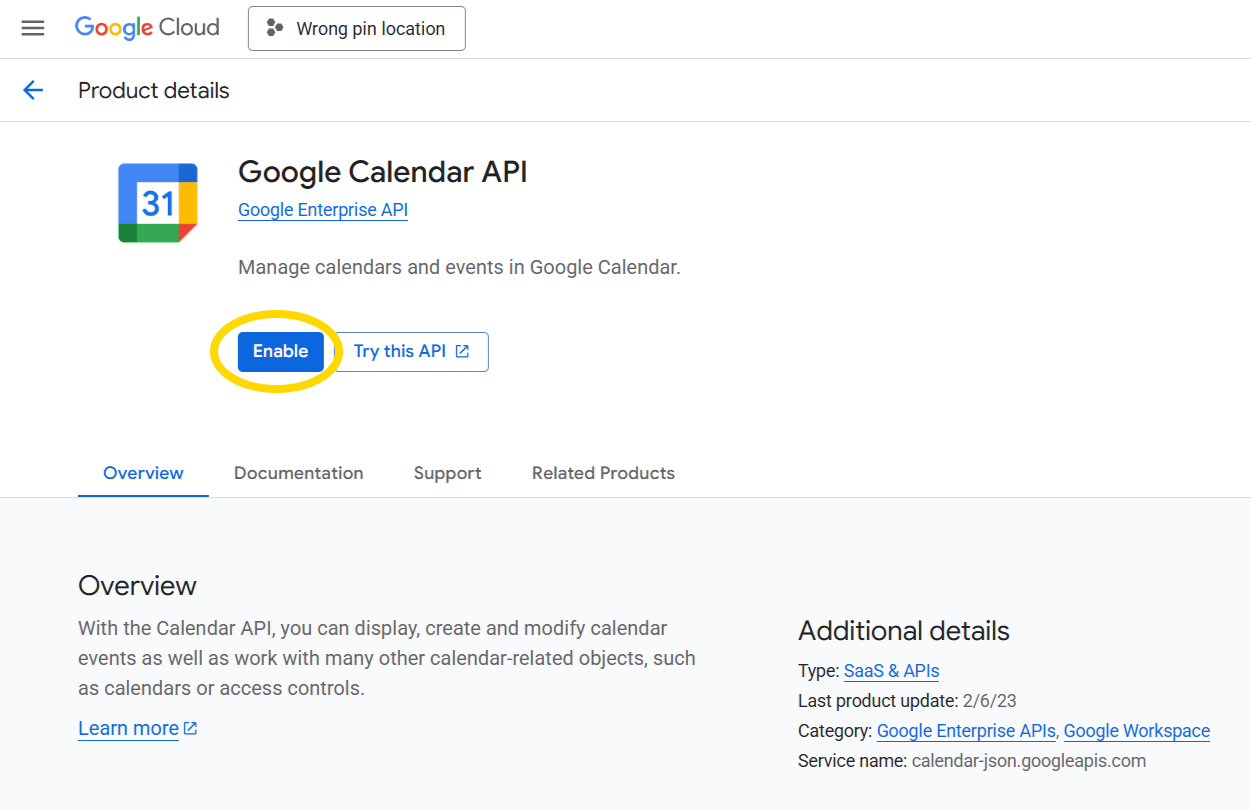
A3. Configure OAuth consent screen
The consent screen is what users see when they click Continue with Google in WordPress.
- Go to APIs & Services → OAuth consent screen (or Google Auth platform).
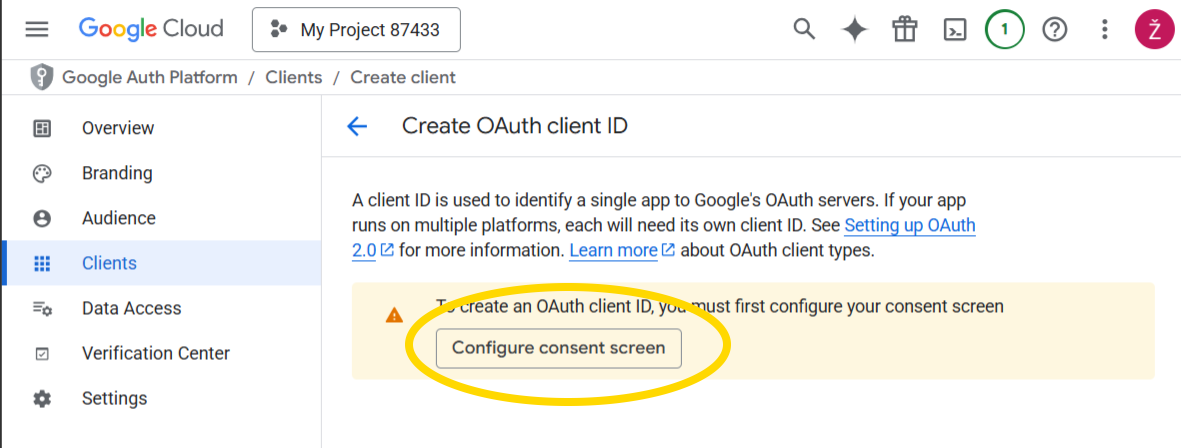
-
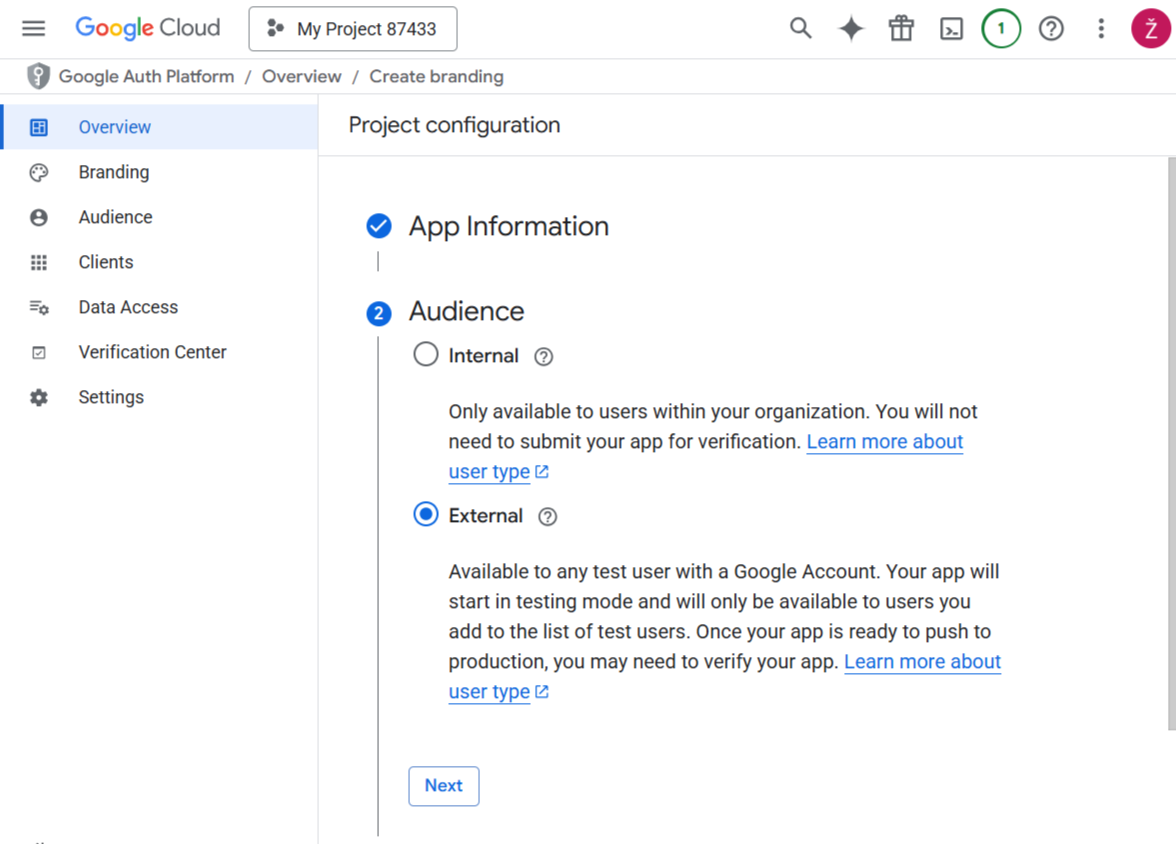
User type
- External - public sites; add test users while in Testing mode
- Internal - Google Workspace only; no test users required
Click CREATE.
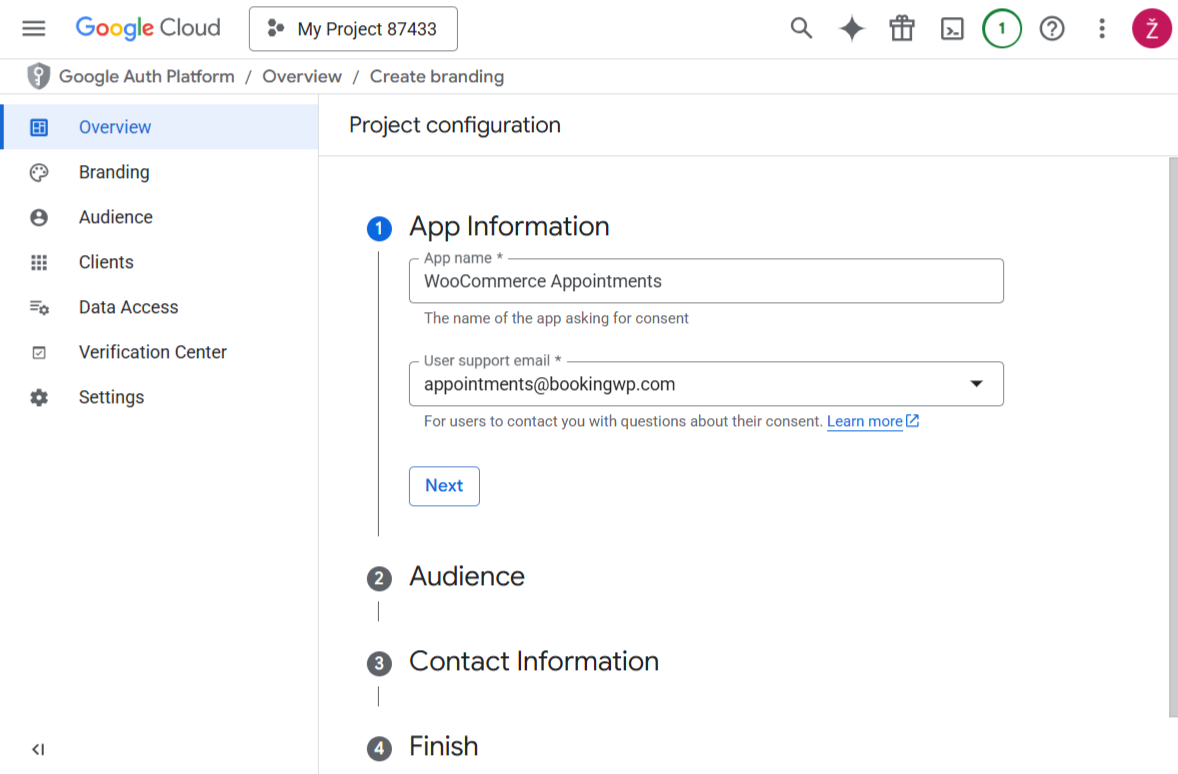
- App information - app name and user support email:
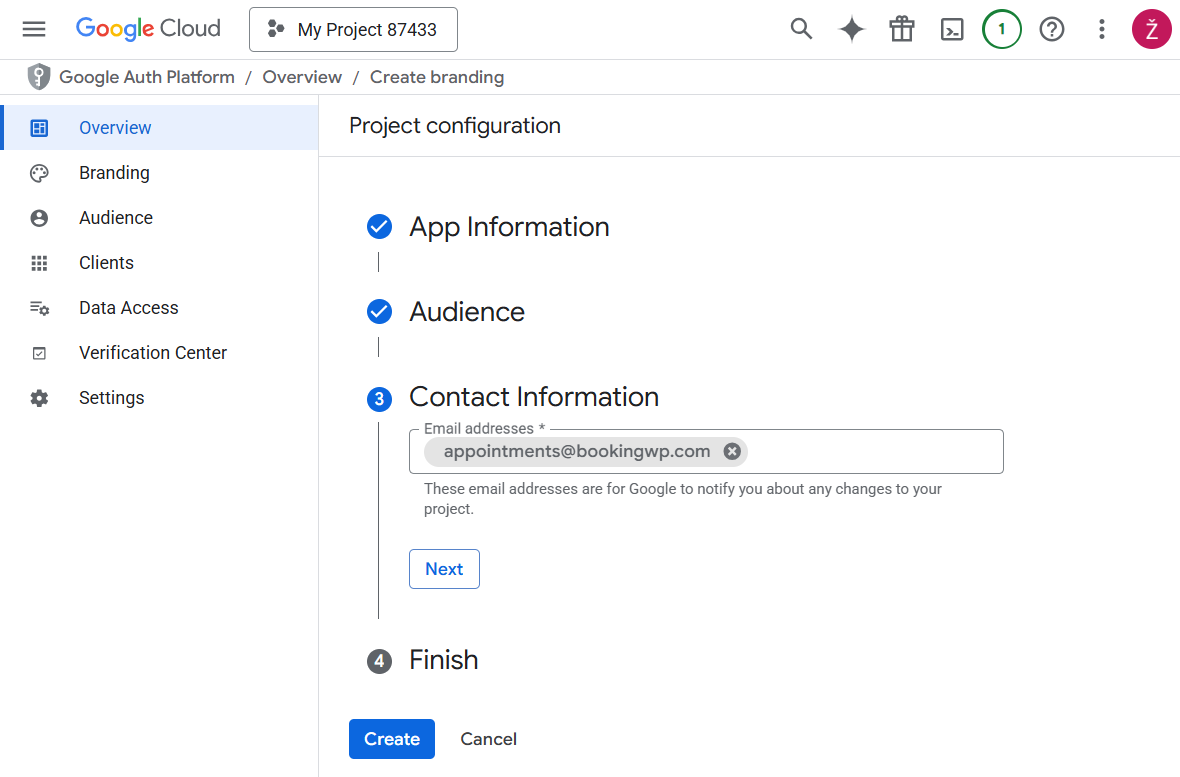
- Contact information - developer contact email(s):
- Branding (logo, app domain) - complete if shown, then Save and continue:
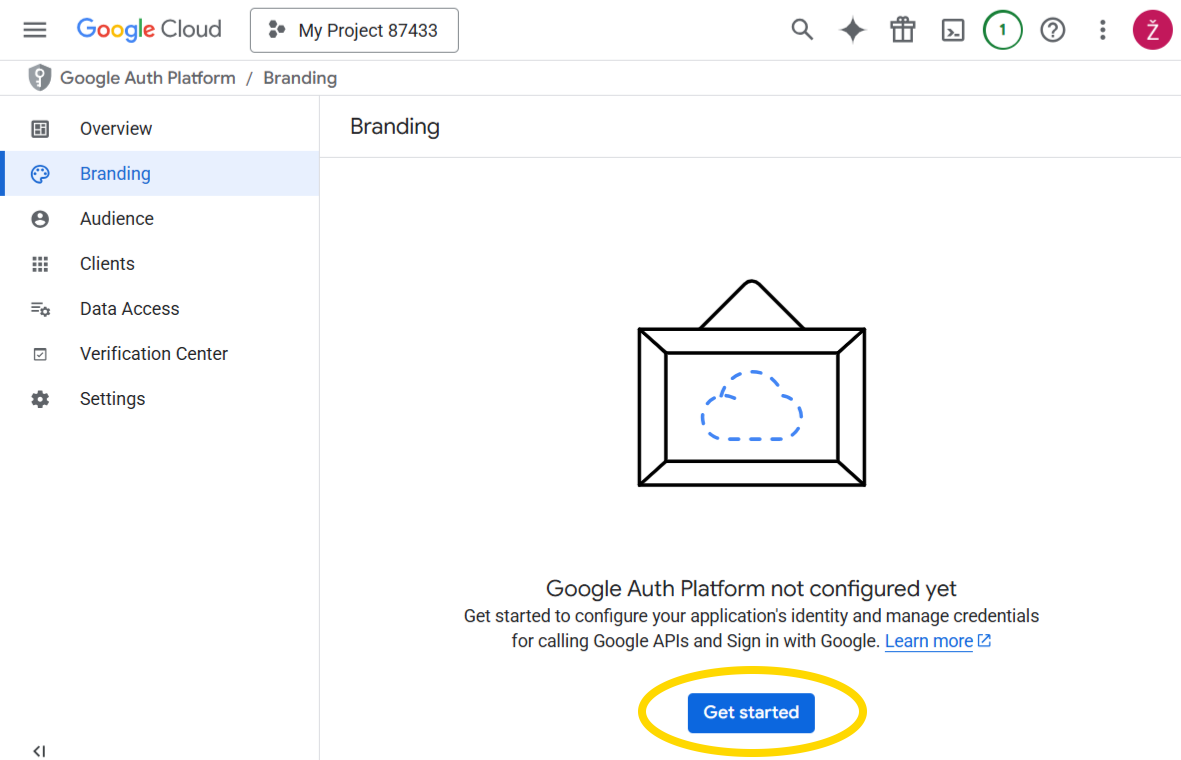
-
Data access (scopes)
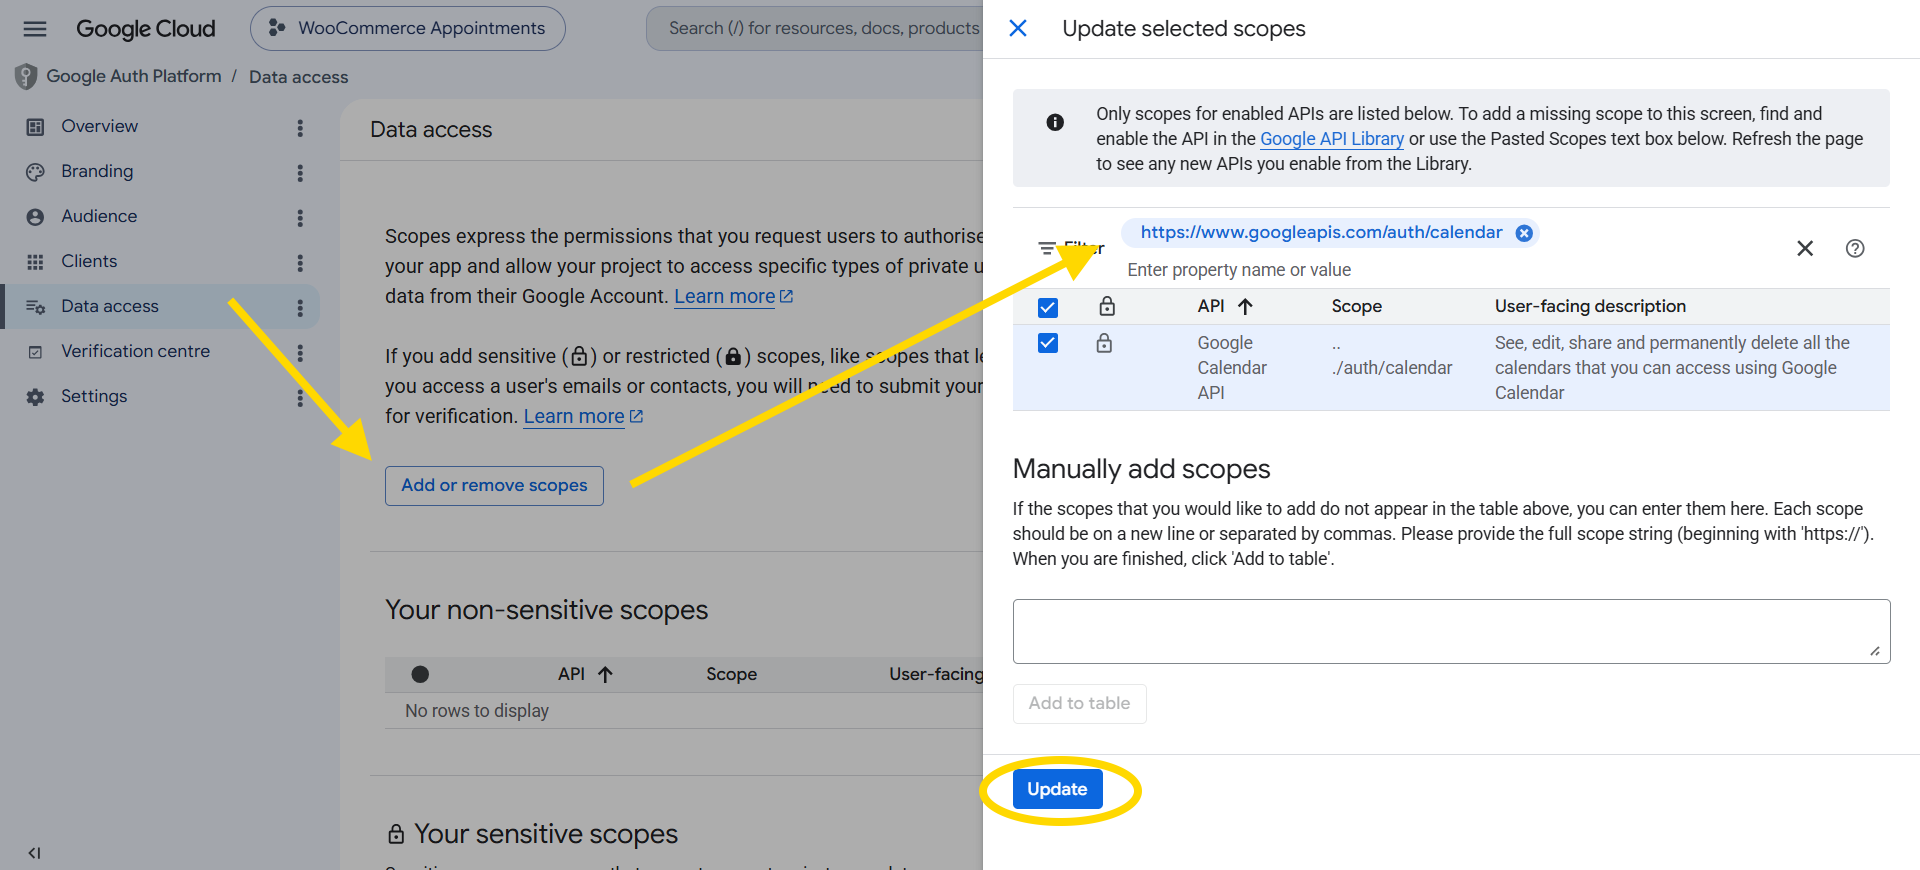
Click Add or remove scopes, search for
calendar, and enable exactly one scope:Scope URL Google Console label (may vary) https://www.googleapis.com/auth/calendarSee, edit, share, and permanently delete all the calendars you can access using Google Calendar Save the scope list.
Minimum required - one scope onlyWooCommerce Appointments requests this single scope during Continue with Google. Add only
…/auth/calendaron the consent screen. You do not need Gmail, Drive, Contacts, or other Google APIs.What the plugin uses this scope for
Feature Google Calendar API Sync mode Populate the Calendar ID dropdown after connect calendarList(list calendars)One-way and two-way Push appointments to Google (create / update) events.insert,events.updateOne-way and two-way Remove Google events when appointments are cancelled events.deleteOne-way and two-way Import busy Google events as availability rules events.list(includingsyncTokenincremental sync)Two-way only Match recurring or edited Google events events.getTwo-way only Scopes you do not need
…/auth/calendar.readonly- read-only; cannot create or update events (outbound sync would fail)…/auth/calendar.eventsor…/auth/calendar.events.readonly- the plugin also callscalendarList; these narrower scopes are not what OAuth requests…/auth/calendar.settings.readonly- Calendar settings are not used- Any non-Calendar scope (Gmail, Drive, etc.)
Match the plugin scope exactlyOAuth is built for
https://www.googleapis.com/auth/calendaronly. If the consent screen lists different scopes, authorization can fail or the Calendar ID list may stay empty. Do not substitute read-only or events-only scopes unless you customize the plugin via thewc_appointments_gcal_oauth_auth_paramsfilter (developer customization).
-
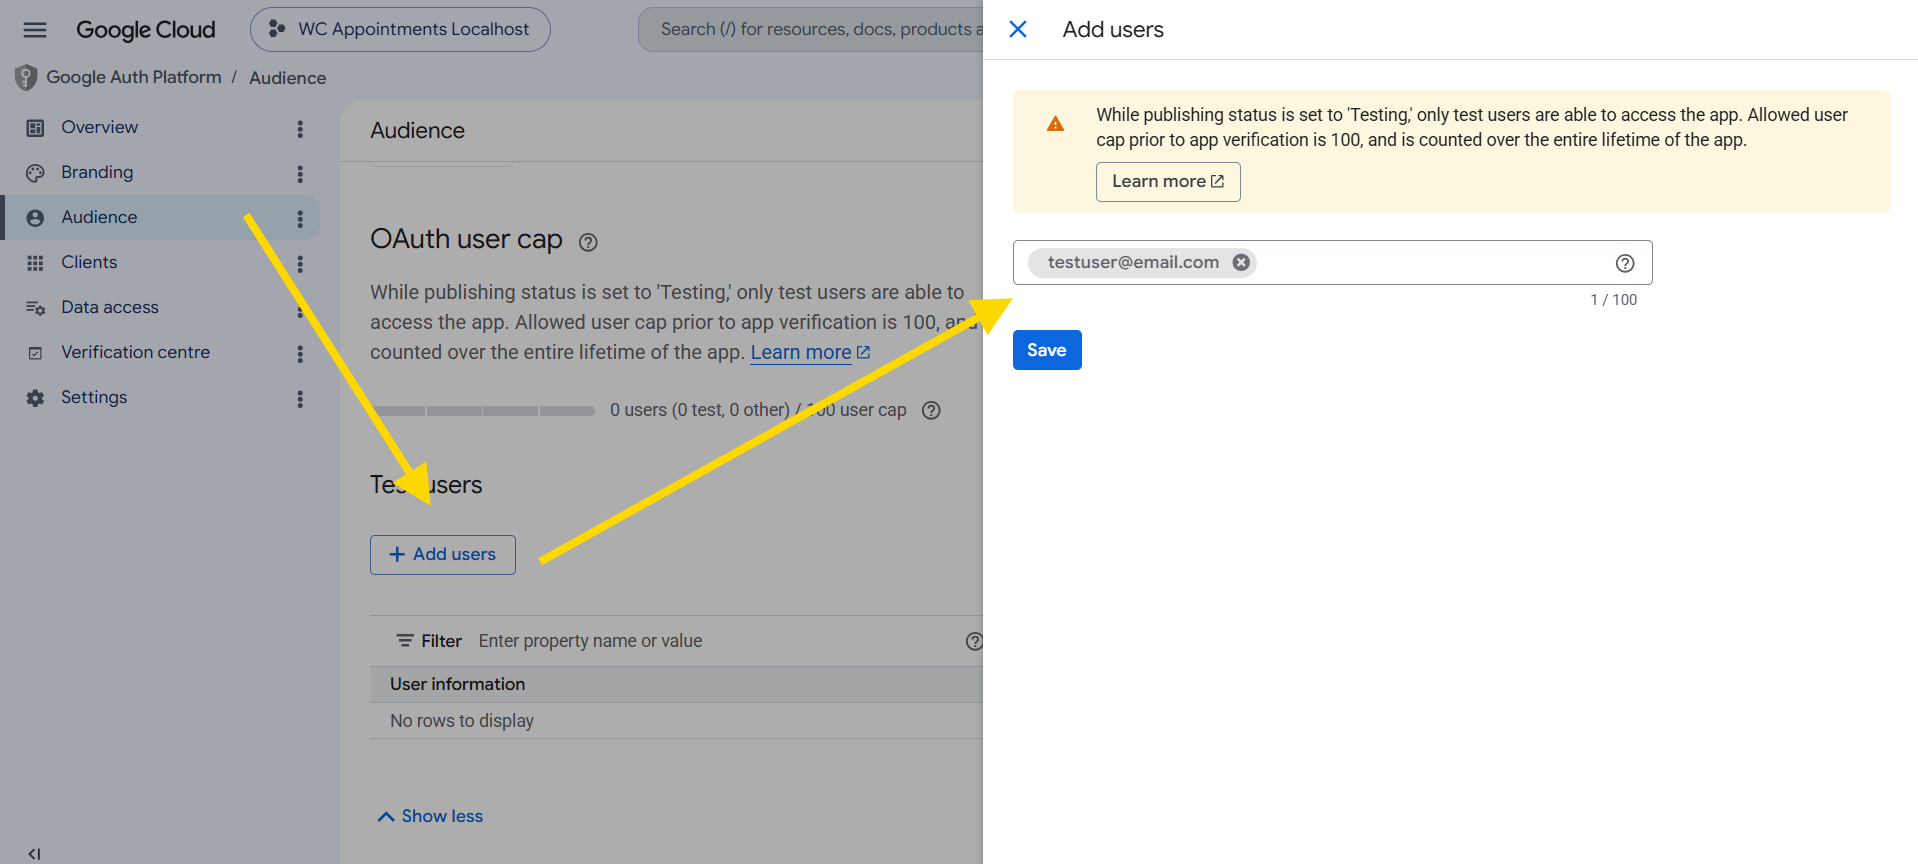
Test users (External apps in Testing only)
Add each Google account that will connect during development.
- Summary - review and return to the dashboard.
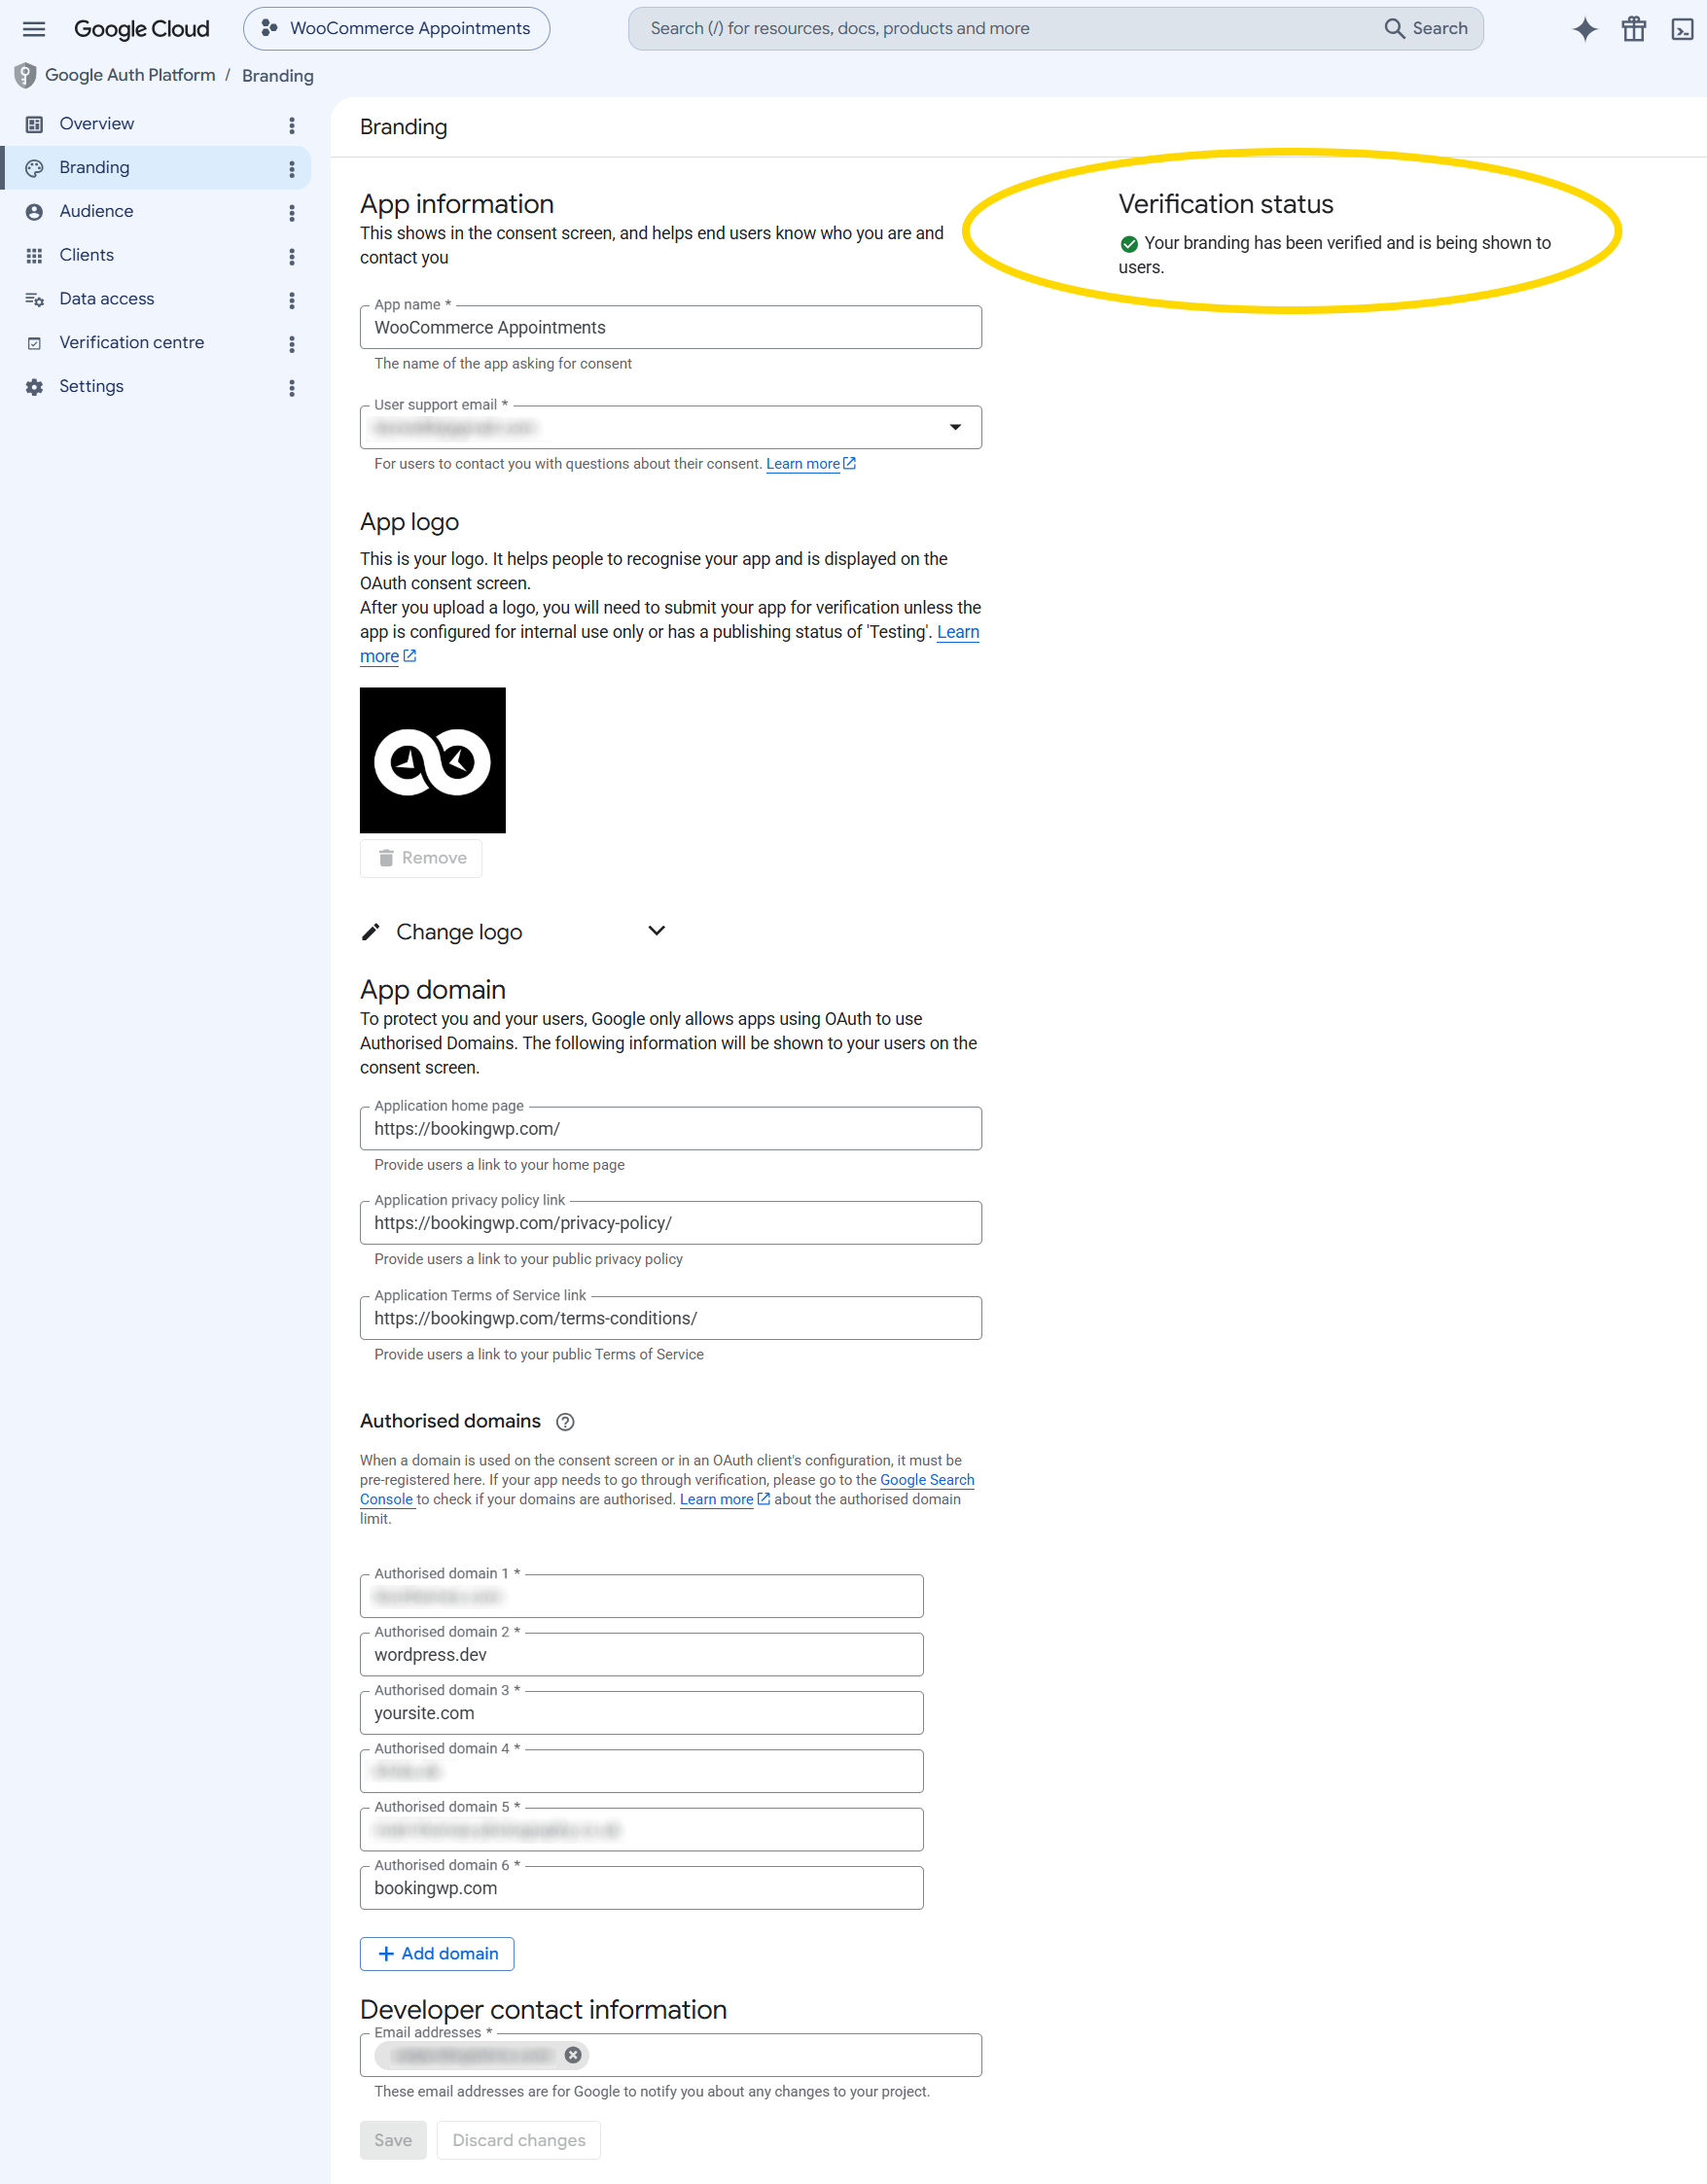
While status is Testing, only listed test users can authorize. Tokens may expire after about 7 days, causing frequent re-auth. For production, publish the app (A5).
A4. Create OAuth client ID
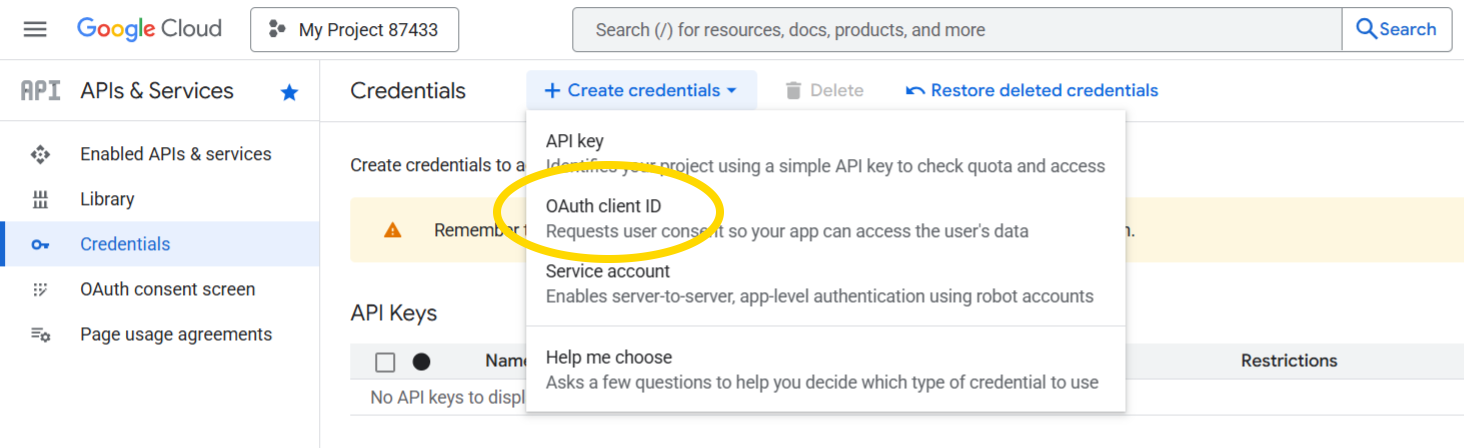
- APIs & Services → Credentials → + Create credentials → OAuth client ID.
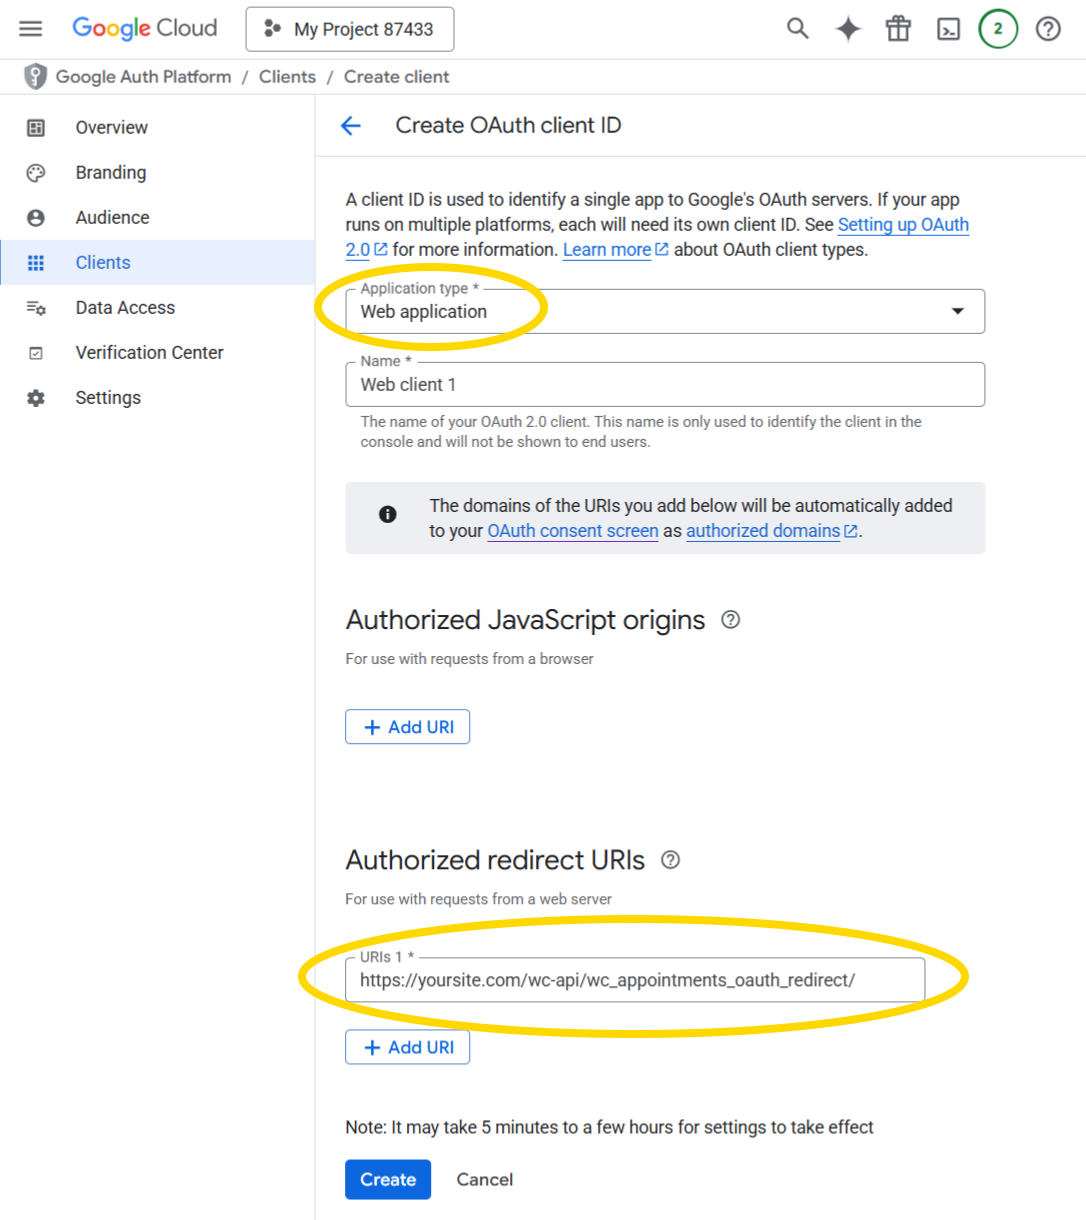
- Application type: Web application → Create.
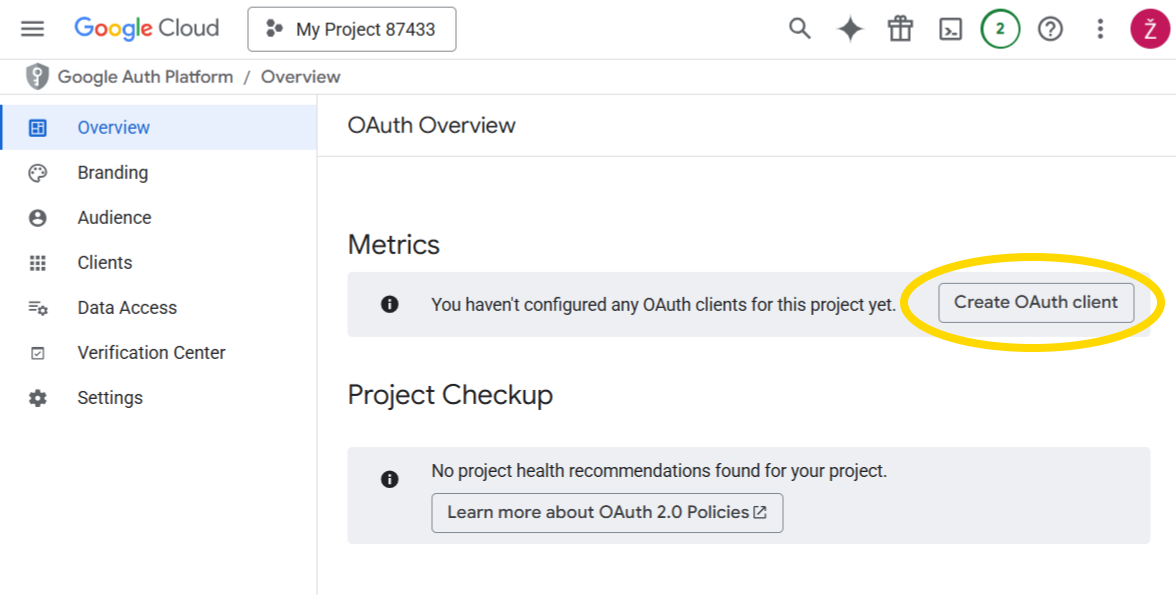
-
Configure the client:
-
Name: e.g.
WooCommerce Appointments -
Authorized redirect URIs - add exactly (replace domain):
https://your-site.example.com/wc-api/wc_appointments_oauth_redirect -
Authorized JavaScript origins - leave empty unless Google support advises otherwise
-
- Click Create and copy Client ID and Client secret immediately.
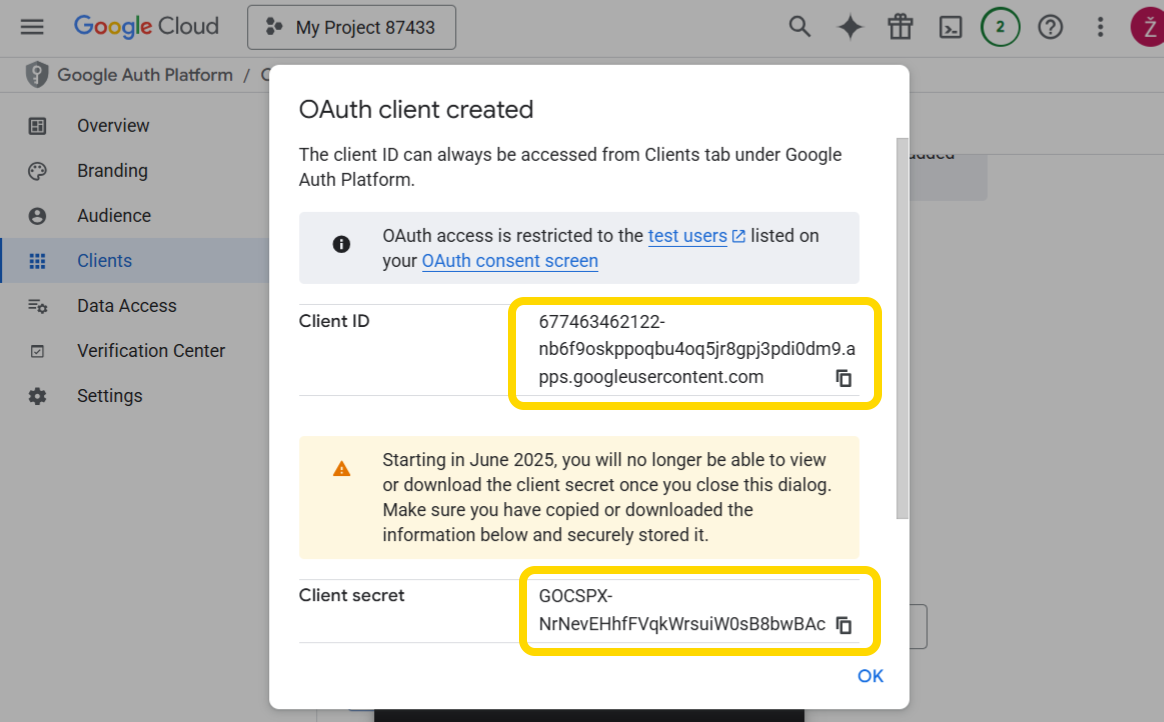
The client secret is shown only once. Store both values securely before closing the dialog.
A5. Publish the app (production)
For External apps used by customers or staff beyond test users:
- OAuth consent screen → Publishing status.
- Click Publish app and confirm.
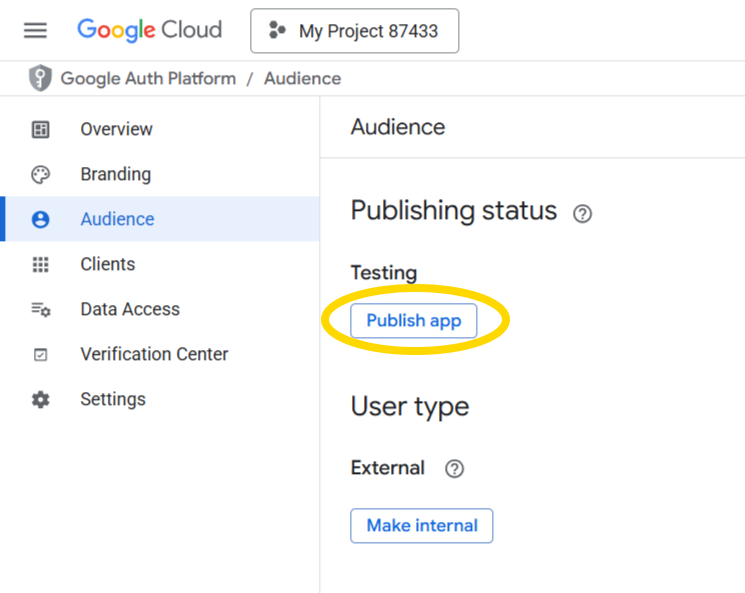
| Status | Typical symptom |
|---|---|
| Testing | Only test users can connect; tokens may expire ~weekly |
| In production | Any Google user can authorize; stable long-lived refresh tokens |
Part B - Store settings
WooCommerce → Settings → Appointments → Google Calendar
B1. Client ID and secret
- Paste Client ID and Client Secret from A4.
- Click Save changes.
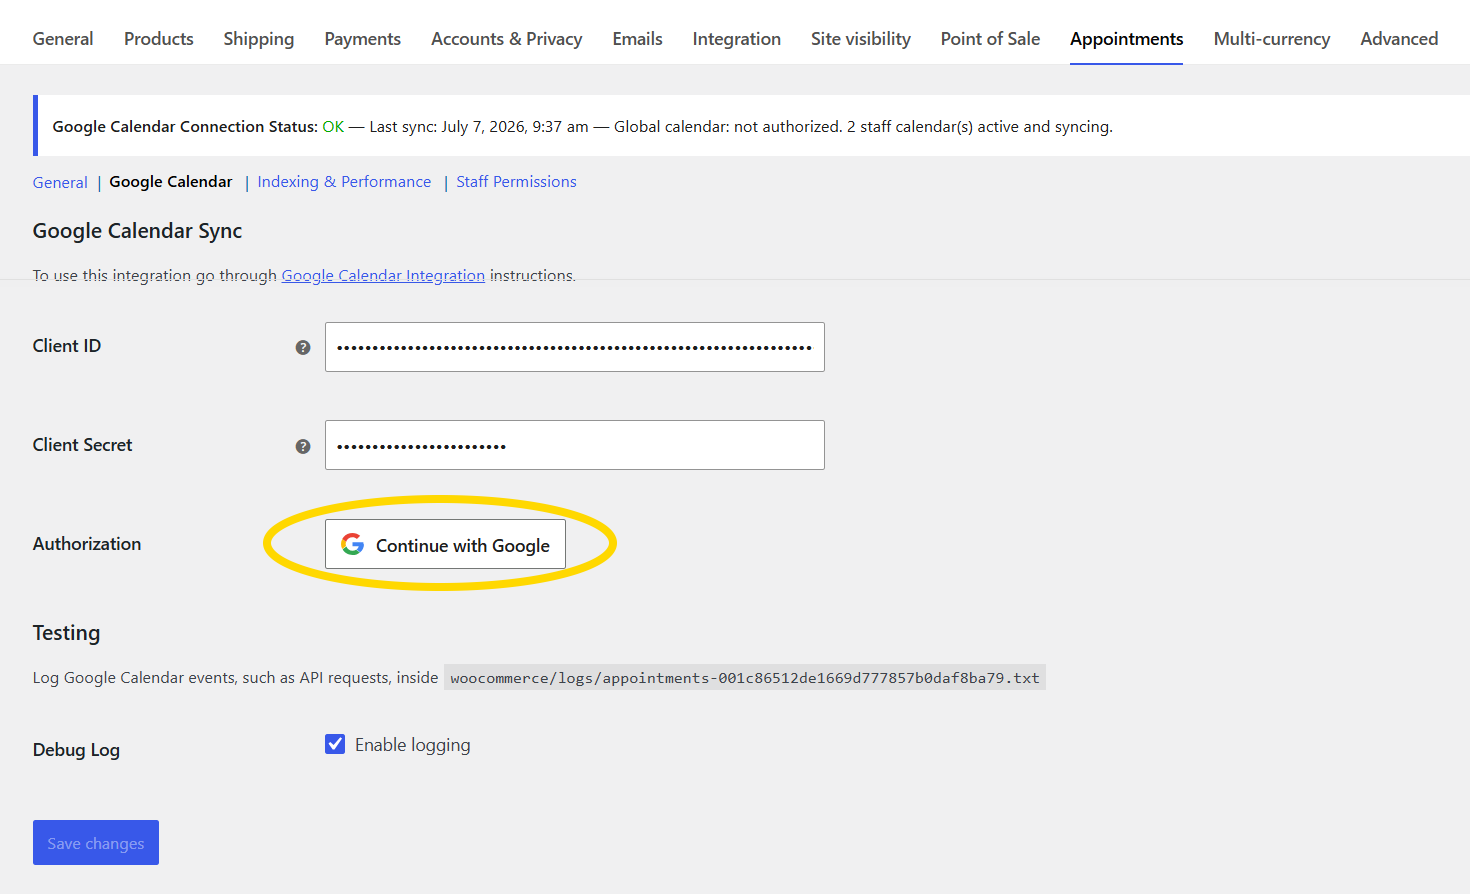
Fields are stored as masked password inputs.
B2. Authorize (Continue with Google)
After saving credentials, click Continue with Google (Google Identity branding).
- Sign in and grant calendar access in the popup.
- On success, the page shows Successfully authenticated.
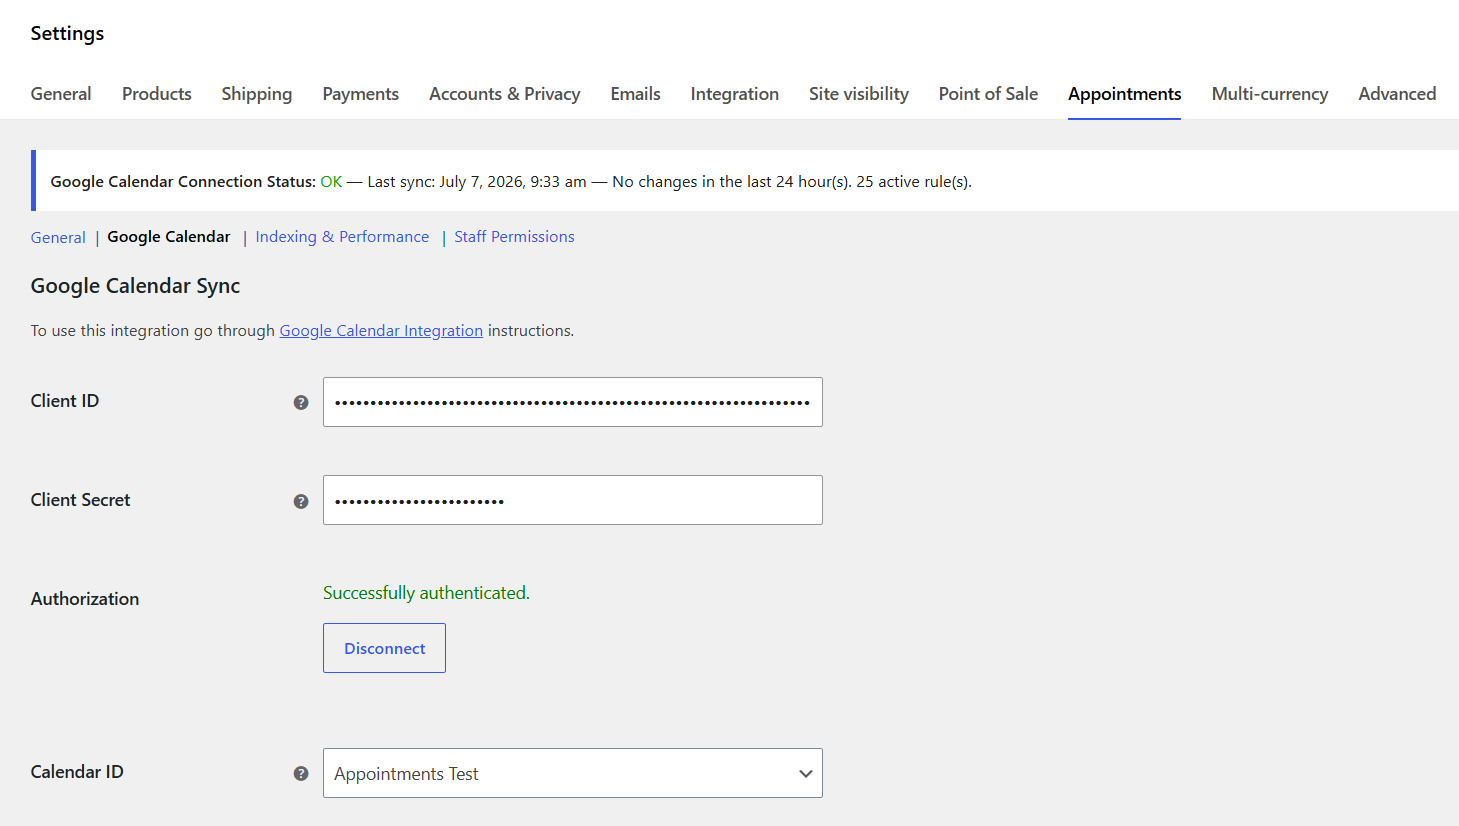
Disconnect clears store tokens and cached access data. It does not disconnect staff calendars.
If two-way sync imported Google events as synced rules, disconnecting the store does not remove them. Export or use Backup & Restore before a full re-sync if you need to roll back.
B3. Calendar ID
After authorization, choose a Calendar ID from the dropdown (or enter manually if the list is empty).
- Leave N/A / empty for staff-only sync - no global inbound rules, but staff can still connect their own calendars
- Required for Re-sync from Google Calendar and global two-way import
Save changes after selecting a calendar.
B4. Sync Preference
Visible only after OAuth is connected.
| Option | Behavior |
|---|---|
| One way - from Store to Google | Appointments push to Google; Google events do not block store availability |
| Two way - between Store and Google | Appointments push to Google and busy Google events import as synced availability rules |
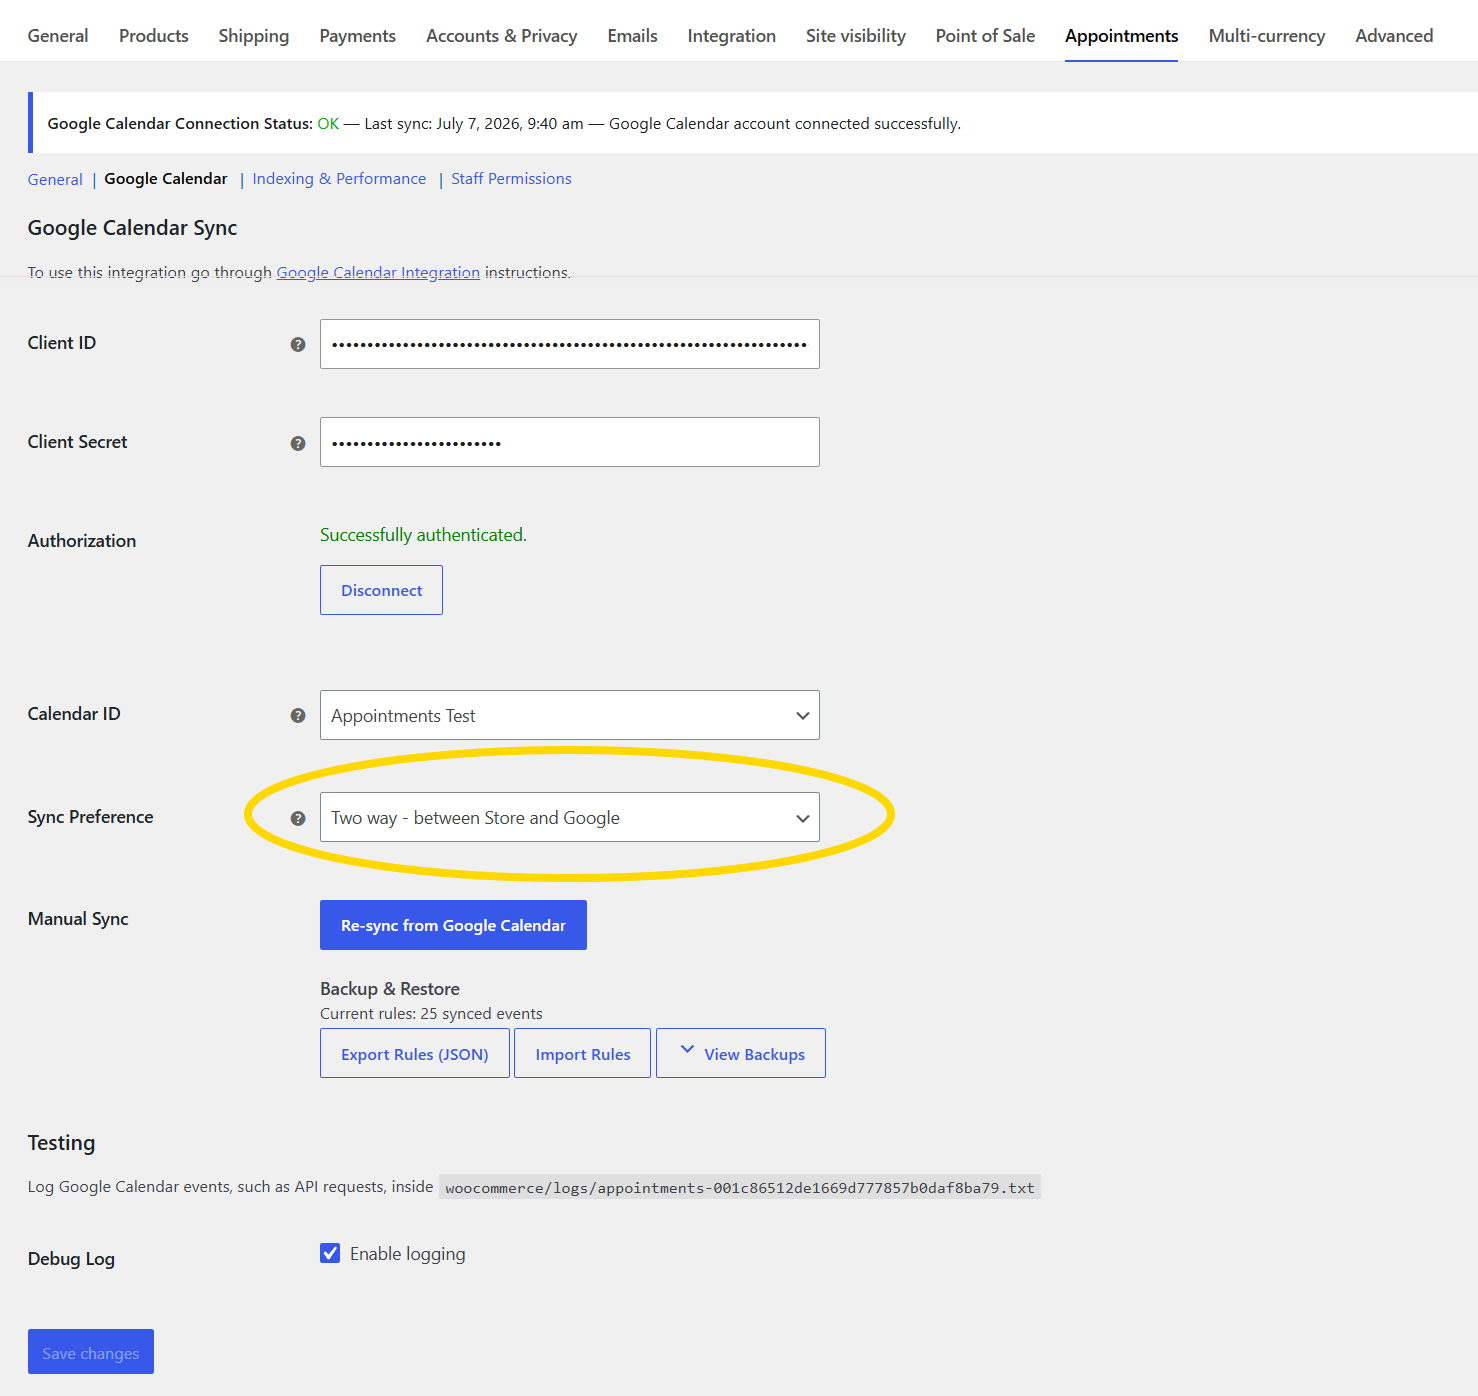
B5. Re-sync from Google Calendar
Shown only when all of the following are true:
- Store is connected (refresh token saved)
- A Calendar ID is selected
- Sync Preference is Two way
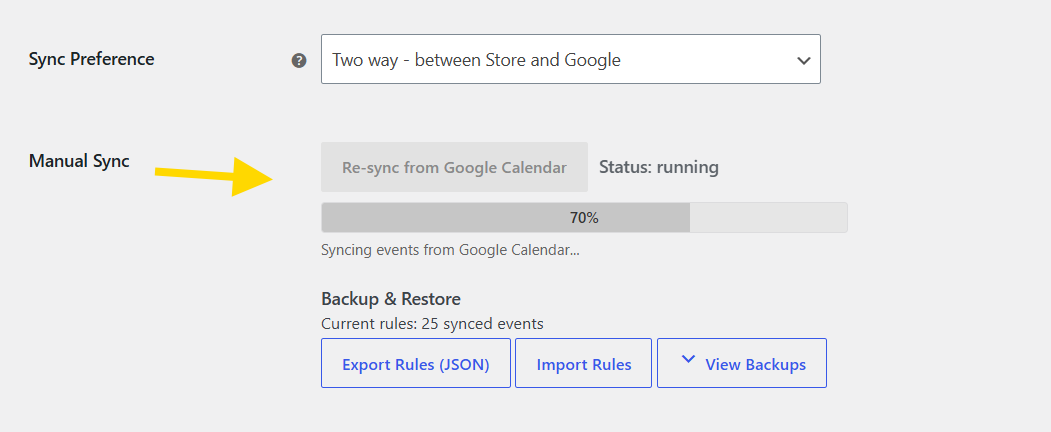
Click Re-sync from Google Calendar for a full import of busy events into synced rules. A confirmation explains that existing synced rules are replaced and a backup is created automatically.
Progress appears in a bar during chunked processing:
Scheduled sync runs automatically in the background. It picks up new and changed busy events going forward.
Re-sync from Google Calendar does a full import of busy events into synced rules. Use it after bulk Google Calendar changes, or when you need to refresh older events that scheduled sync has not touched yet.
B6. Backup & Restore
In the Backup & Restore section (two-way sync enabled and a calendar selected):
| Action | Purpose |
|---|---|
| Export Rules (JSON) | Download current synced rules |
| Import Rules | Restore from a JSON export |
| View Backups | List auto-backups created before re-sync |
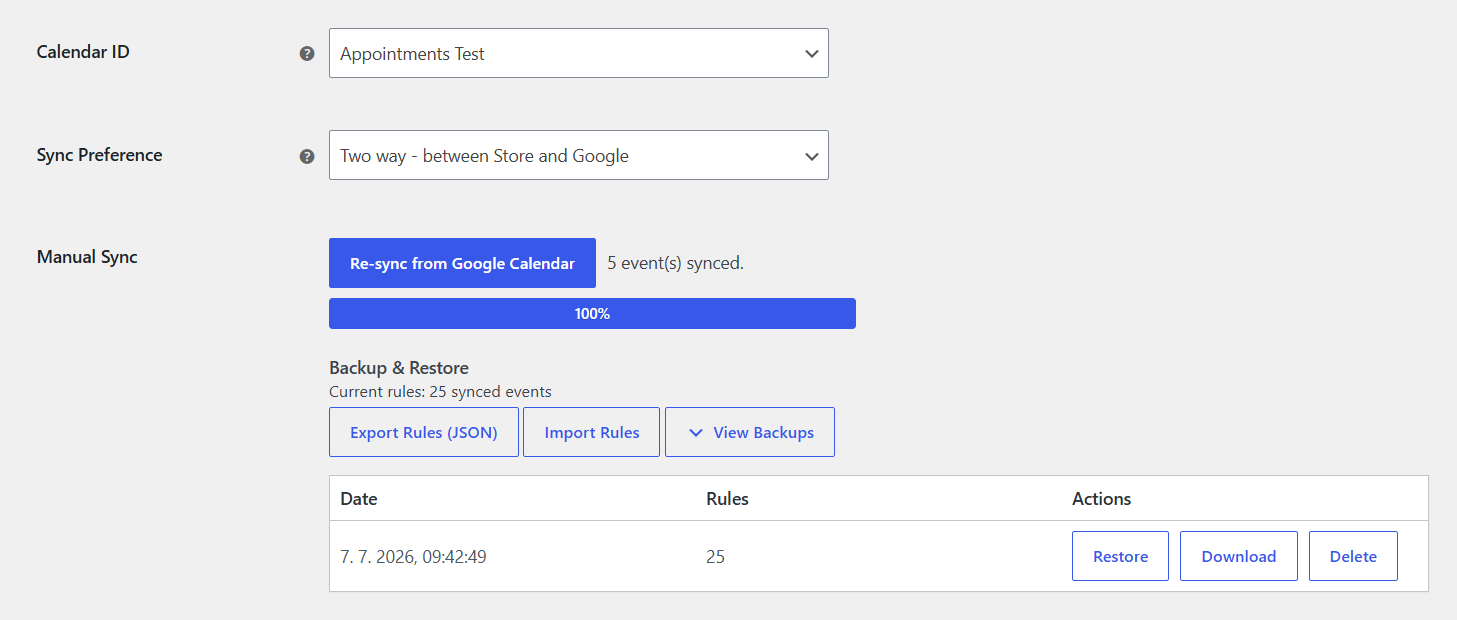
- Up to 5 backups retained; entries older than 7 days are pruned
- Restoring replaces synced rules without pushing changes back to Google
B7. Debug log
Testing section (separate from sync controls):
- Enable Debug Log to record API activity
- Log file path is shown on the settings screen (under
woocommerce/logs/)
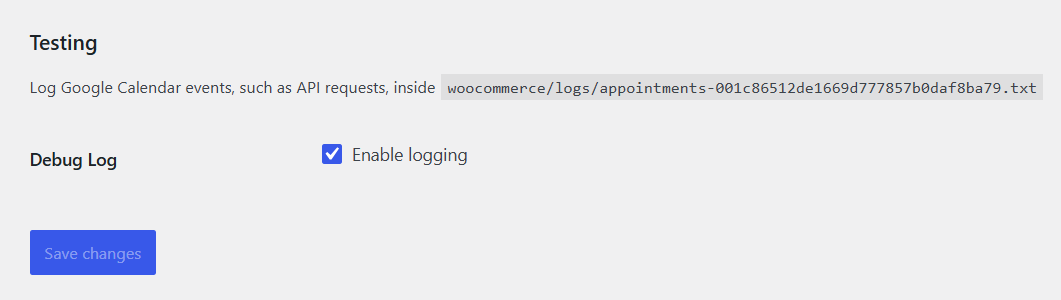
Enable only while troubleshooting; disable in production.
B8. Token refresh
Access tokens refresh automatically (default: about every 50 minutes) via Action Scheduler. Adjust interval:
add_filter( 'woocommerce_appointments_gcal_token_refresh_interval', function () {
    return 30 * MINUTE_IN_SECONDS;
} );
If sync stops with auth errors, try Disconnect → Continue with Google again, or publish the OAuth app if still in Testing.
Part C - Staff calendars
Staff connect personal Google accounts. They do not inherit the store OAuth session or calendar list.
C1. Prerequisites
- Store Client ID and Client Secret saved (Part B1).
- Staff user has the Shop Staff role (or
wc_appointment_staffwhere applicable).
C2. Where to connect
| Who | Path |
|---|---|
| Staff (self) | Staff Portal → Profile → Google Calendar |
| Admin | Users → edit staff user → Staff Profile → Google Calendar |
Requires Staff Portal or admin user edit access.
C3. Per-staff calendar and sync mode
- Click Continue with Google and authorize.
- Select Calendar from the staff member's Google account.
- Choose Sync Mode:
- One-way (Appointments → Google) - appointments appear on their calendar only
- Two-way sync - their busy Google events block their assigned slots
- Connected status and Disconnect appear when linked.
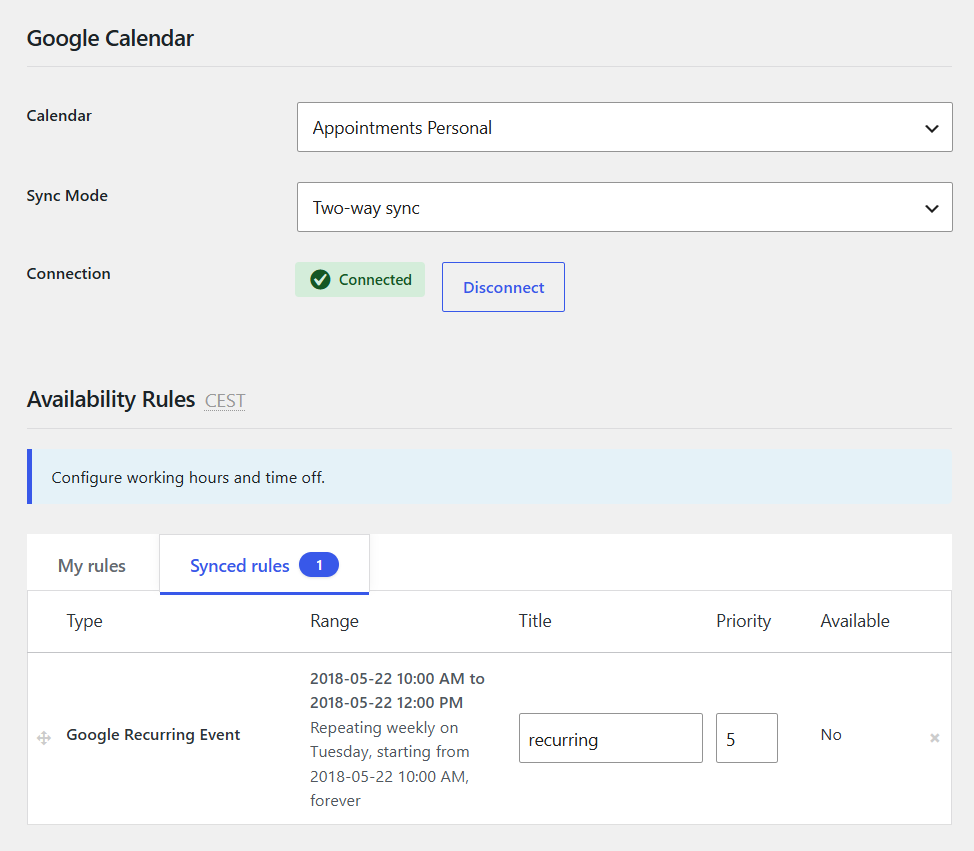
Staff Busy blocks appear under Unavailable when you open that staff member in Availability. Store-wide Busy shows on General.
Disconnecting a staff calendar clears local tokens only; it does not revoke the app at Google.
How sync behaves
Add filters in your child theme's functions.php or a small site-specific plugin - not in the plugin files (updates will overwrite them). See Where to add code.
Appointment statuses (store → Google)
By default, appointments sync when status is confirmed, paid, or complete. Extend with:
add_filter( 'woocommerce_appointments_gcal_sync_statuses', function ( $statuses ) {
    $statuses[] = 'unpaid';
    return $statuses;
} );
See Sync unpaid appointments to Google Calendar → Customization recipes (license required).
Synced rules (Google → store, two-way)
- Imported rules are read-only in WordPress (except priority and title on some rows)
- Edit or delete the event in Google Calendar, then re-sync or wait for scheduled sync
- Scheduled inbound sync is forward-only - it does not re-import your entire Google history on every run
- Default priority for synced events is 5 (manual rules default 10)
Details: Availability - Google Busy.
Direction summary
| Entity | One-way | Two-way |
|---|---|---|
| New WooCommerce appointment | → Google event | → Google event |
| Updated appointment | → Updates Google | → Updates Google |
| Busy Google event | - | → Blocks availability (synced rule) |
| Future Google event edit/delete | - | → May update/cancel linked appointment |
| Free Google event | - | Ignored |
Google Meet
Needs Locations & rooms (beta) on, an Online location, and store Google Calendar connected (Part B).
- Create an Online location - Locations
- On the product Locations tab, set Location to Fixed, show name, Fixed, or Customer selected with that venue
- Set Video meeting to Google Meet
- Book a test appointment - Calendar sync creates the join link on the Google event
Customers see Join on My Account → Appointments (with a starts-in countdown when near start). Emails and the admin appointment panel show Join Meeting.
A static Join URL on the Online location still works without Meet if you prefer a fixed link.
Google Meet is only for Online venues after the beta is enabled. Zoom / Teams are not in 5.5.
Troubleshooting
| Symptom | Check |
|---|---|
| Redirect URI mismatch | Redirect URI in Google Cloud must match exactly: https://YOUR-DOMAIN/wc-api/wc_appointments_oauth_redirect |
| 404 on OAuth callback | Permalinks - use Post name (or any non-Plain structure) and save. See Permalinks settings screenshot |
| Access blocked / app not verified | External app: add user as Test user, or Publish the app |
| Re-auth every ~7 days | App still in Testing - publish to production |
| Continue with Google missing | Save Client ID and Secret first |
| Sync Preference hidden | Complete OAuth first |
| Re-sync button missing | Select Calendar ID and set Sync Preference to Two way |
| Events not blocking slots | Event must be Busy; two-way must be enabled; allow time for sync |
| Wrong times in Google | Align site timezone with Google Calendar timezone |
| Calendar list empty after connect | Disconnect and reconnect; check API is enabled; review debug log |
| 404 on calendar fetch | Plugin clears token - re-select calendar after reconnect |
| Synced rules missing after site clone | Inbound sync skips events tied to another site URL - run Re-sync from Google Calendar on the live site |
Enable Debug Log (B7) and reproduce the issue before contacting support.
Related
- Global Settings
- Availability - Google Busy under Unavailable
- Staff management
- Locations - Online venues and Video meeting
- Developers - hooks for Google Calendar sync (full list after developer login)